polymer clay

๐‰๐ฎ๐ฌ๐ญ ๐’๐Š๐”๐‹๐‹๐๐“๐ˆ๐๐† ๐Ÿ’€| ๐Œ๐š๐ค๐ข๐ง๐  ๐Œ๐ข๐ง๐ข๐š๐ญ๐ฎ๐ซ๐ž ๐’๐ค๐ฎ๐ฅ๐ฅ๐ฌ ๐ฐ๐ข๐ญ๐ก ๐๐จ๐ฅ๐ฒ๐ฆ๐ž๐ซ ๐‚๐ฅ๐š๐ฒ

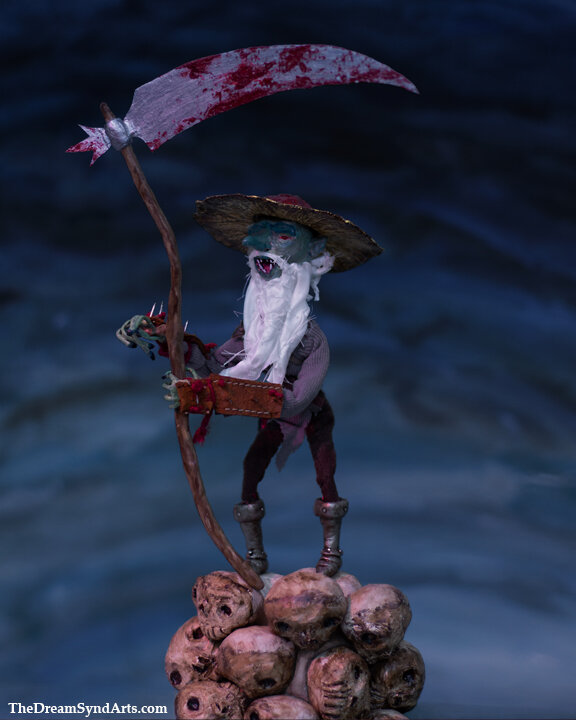
I wanted to have the figure standing on a pile of skulls and so I sculpted a bunch of miniature skulls with polymer clay as an art doll prop in the image. I was inspired by stylized works by people such as Shaun Tan from his book โ€œThe Singing Bonesโ€ and by the work of sculptor Dug Stanat.

Watch me get up to some Skullpting

RedcapSkullsWEB.jpg

Prints of the dimensional-illustrations made with the redcap art doll are available here:

Open Edition Prints

โ€œRedcapโ€™s Rageโ€ https://www.inprnt.com/gallery/thedreamsyndicate/redcaps-rage-evil-fae-fantasy-art/

โ€Redcapโ€™s Restโ€ https://www.inprnt.com/gallery/thedreamsyndicate/redcaps-rest-evil-fae-fantasy-illustration/

โ€œRedcapโ€™s Reapingโ€ https://www.inprnt.com/gallery/thedreamsyndicate/redcaps-reaping-wicked-fae-fantasy-art/


The skulls were made with original Sculpey, which is something I generally avoid using unless itโ€™s for a background element. The issue I tend to have with sculpting with the original polymer clayโ€™s that itโ€™s really soft and gets even softer as your hands warm up as you work with it. In this case, I set myself the challenge of making these little sculptures with minimal clay, with each skull being mostly comprised of aluminum foil and also that I would make each one quickly, spending less than five minutes on each individual sculpture.

Once sculpted and baked in the oven, the skulls were tinted with raw umber ink, painted with a lightly earthy tinted white, and a final wash of ink was again applied. I found the change of pace freeing to work in such a loose and abstracted style.

Thanks for joining me so far and hereโ€™s to the adventures we have in future! To be the first to know when I launch new polymer clay art videos, be sure to subscribe to my YouTube channel and hit the bell icon. Catch all of my videos here: https://www.youtube.com/thedreamsyndicatearts. You can also find many of the supplies I use in crafting here: https://www.thedreamsyndarts.com/supplies-gear/. And sign-up for my newsletter (in the sidebar) to get the latest studio goings-on! Thanks so much for joining me on this journey and until next time: Make. Believe!

๐Œ๐š๐ค๐ข๐ง๐  ๐š ๐๐จ๐ฌ๐Ÿ๐ž๐ซ๐š๐ญ๐ฎ ๐•๐š๐ฆ๐ฉ๐ข๐ซ๐ž ๐€๐ซ๐ญ ๐ƒ๐จ๐ฅ๐ฅ

I recently wrapped-up making a Nosferatu vampire art doll inspired by the character from the classic film of the same name. I used reference images from the film and also found some inspiration as I did research about the original film, there was one line that stuck with me that described Nosferatu as vermin-like as opposed to the more debonair portrayals of vampire that weโ€™ve had in later media.


One point where my version of Nosferatu diverges from the film version is that the costumers had given him these long, thick eyebrows, which I found to be kind of silly looking, so I eliminated them from the design. Many modern interpretations of Nosferatu omit them, so I canโ€™t be the only one that feels this way.

This is the final illustration that was created with the vampire art doll. If you would like a print, you can get one here.

This is the final illustration that was created with the vampire art doll. If you would like a print, you can get one here.


It was also fascinating to read that Nosferatu was actually an illegitimate Count Dracula. As many people are aware, Bram Stoker wrote โ€œDraculaโ€ and when he passed his widow, Florence Balcombe, had authority over his works and didnโ€™t authorize a film adaptation of the novel. This didnโ€™t prevent the creators of Nosferatu from going so far as to advertise Nosferatu as adapted from Stokerโ€™s Dracula!

I hope you enjoyed seeing this lurking terror come together! To be the first to know when I launch new polymer clay art videos, be sure to subscribe to my YouTube channel and hit the bell icon (but because YouTube's wonky, you can also join the newsletter). Catch all of my videos here:  https://www.youtube.com/thedreamsyndicatearts. You can also find many of the supplies I use in crafting here: https://www.thedreamsyndarts.com/supplies-gear/. Until next time, make believe!


Making Slimy Slug Art Dolls with Resin Slime ๐ŸŒ

Today we'll be embellishing wooden display bases as we make slimy slug art dolls with resin slime! I'd previously sculpted these polymer clay slug art dolls with super sculpey over aluminum foil armatures, made these handsome display bases, and only recently had the idea of "slug trail" trailing behind them as if the slugs (slowly) made their way up on to the base.

ย 

WATCH MAKING SLIMY SLUG ART DOLLS WITH RESIN SLIME ๐ŸŒ

ย 

I'd already given the slugs a thin coating of two part epoxy resin to give the sculpey art dolls a wet sheen look and I used the material again to make the slimy path for the little critters. Since I've had these particular opened bottles of epoxy resin for a few years, this was a great way to use the older materials rather than wasting them. 

ย 

SlugsArtDolls1.jpg

Slimy Slug Sculptures

These slug sculptures can slime their way to your home & heart.

ย 

To be the first to know when I launch new polymer clay art videos, be sure to subscribe to my YouTube channel and hit the bell icon. Catch all of my videos here:  https://www.youtube.com/thedreamsyndicatearts. You can also find many of the supplies I use in crafting here: https://www.thedreamsyndarts.com/supplies-gear/. And sign-up for my newsletter to get the latest studio goings-on! Thanks so much for joining me on this journey and until next time: Make. Believe!

Painting the Brambling | Painting a Fantasy Creature Head

Now that the brambling's head is sculpted to my liking, it's time to lay down some paint! When painting a fantasy creature head, it's actually kind of important to ground yourself in realism because bramblings are elusive in the wild! I had to do the next best thing and bring a couple of tree branches into the studio. Who'd have thought realism's the best strategy when painting a fantasy creature head? By looking at this tree branch I could observe that it was largely a warm grey tone with moments of green and brown on it rather than that iconic brown Crayola crayon that we might all instantly imagine.

ย 

Watch the Brambling Head Be Painted with Acrylics Here

ย 

I used a range of earth-tones in painting the fey creature's head- siennas, umbers, ochers, and greens with touches of grey tones to dull-down the pigments. I also painted the head generally lighter than I would have naturally due to the fact that I was about to embark on trying my hand with an ink wash technique...

EXPERIMENTING WITH INK!

ACRYLIC INK

In painting this head, I tried a technique that was new to me: using an acrylic ink wash with dark toned ink. I had carved a lot of bark texture all over the brambling and I wanted a way to darken the recessed areas that didn't involve my painstakingly painting in dark tones and then carefully trying not to undo this work as I painted-in lighter tones. Before I used the technique on the actual fantasy art doll head, I tested on scrap sculpted piece I had (who'd have thought I was doing myself a favor when I accidentally sculpted two right hands for this art doll?!). Admittedly, I still feel like I can do a better job at highlighting sculpted details with this technique, but overall, I'm happy with the outcome.

ย 

If you would like a print of the Brambling final image, you can purchase it HERE.

ย 

I hope you enjoyed exploring this magical fey creature as much as I have! To be the first to know when I launch new polymer clay art videos, be sure to subscribe to my YouTube channel and hit the bell icon (but because YouTube's wonky, you can also join the newsletter). Catch all of my videos here:  https://www.youtube.com/thedreamsyndicatearts. You can also find many of the supplies I use in crafting here: https://www.thedreamsyndarts.com/supplies-gear/. Until next time, make believe!

MAKING A ST. GEORGE ART DOLL โš”๐Ÿ‰

In this part of the process of making a St. George art doll, the poseable doll's made from a variety of mixed media. Most of the materials your as likely to find in a hardware store as you are an art supply or hobby shop. The armature consists of twisted aluminum wire, aluminum tubing in the neck and used at the forearms, a length of steel wire to give the figure stability and allow it to anchor into a set or display base, and plumber's epoxy. The body's massed-out with upholstery foam and then clothing's sewn around the art doll.

ย 

Watch Part 5 in the St. George & the Dragon Piece | MAKING A ST.  GEORGE ART DOLL โš”๐Ÿ‰:

ย 

An art doll's neck doesn't need to be reinforced with the aluminum tubing, you can typically just drill right into the clay if you'd like, but the way I design my characters, I like them to have thin necks because that's the way I tend to draw figures- I like lanky, gawky, attenuated characters. If I were to make a character's neck as thin as I do without putting in the tubing and drill into it, the backed polymer clay would likely crack and crumble around the drill bit.

ย 

Once the aluminum and steel wire are all twisted into place, they're secured with plumber's epoxy that's molded into a form to create a cylinder shaped chest and smaller oblong cylinder for the pelvis, which all takes about an hour to set (if you were handling the plumber's epoxy more vigorously, you might want to give it a day). From there, I use the figure's contours to sketch-out a front and back form out of the upholstery foam and cut it out with pair of scissors. These front and back pieces get attached to the plumber's epoxy with a resin based epoxy. Lastly I sketch-out the amount of fabric I'll need to sew the clothing, leaving a bit of a seam allowance. Ordinarily, it's a good idea to use lighter weight fabric, but for the look of the chain-mail armor, I used a heavier upholstery weight fabric that was kind of a pain to work with. The process of making St. George art doll probably took a couple of full work days, not including the time I spent sketching-out details or gathering materials.

ย 

If you want to make the imaginary a reality, be sure to subscriber on YouTube!

If you want to be the first to know when I launch new polymer clay art videos, be sure to subscribe to my YouTube channel and hit the bell icon (but because YouTube's wonky, you can also join the newsletter). At present, I am launching new videos Saturdays at 2pm EST and I will keep this information up-to-date on my YouTube channel's banner and "about" section here:  https://www.youtube.com/thedreamsyndicatearts.

Sculpting St. George ๐Ÿ‰

When sculpting St. George, I wanted a younger interpretation of our hero. Just about every time I'm sculpting an art doll, I begin with sketches and for this piece I did a few quick studies from teenage aged boys- some of the reference pictures came from Google image searches and some from this great book of Norman Rockwell's depictions of childhood. I also spent spent some time looking at prior depictions of St. George in medieval and renaissance art.

Watch Part 4 in the St. George & the Dragon Piece | Sculpting St. George ๐Ÿ‰:

ย 

I wanted to capture a sort of frightened, panicked expression and I was somewhat thinking of Kevin McCallister from "Home Alone", you know, the shaving cream, "Aaahhhhhhhhhh!" scene. My idea for the finished piece of art is to create an image that references the legend of St. George and the Dragon, but to also convey the concept that the dragon isn't nearly as threatening as George thought and it was his imagination making the dragon more terrible than he thought.

ย 

If you want to make the imaginary a reality, be sure to subscriber on YouTube!

If you want to be the first to know when I launch new polymer clay art videos, be sure to subscribe to my YouTube channel and hit the bell icon (but because YouTube's wonky, you can also join the newsletter). At present, I am launching new videos Saturdays at 2pm EST and I will keep this information up-to-date on my YouTube channel's banner and "about" section here:  https://www.youtube.com/thedreamsyndicatearts.

Taking Flight with my First (Solo) YouTube Video with a Dragon Head Sculpt!

I've spent the last few months getting things together to bring this first polymer clay art doll tutorial (as well as many others). In this first video, I'm making a dragon head sculpt with Sculpey and in future videos I'll show you more of my process for making poseable art dolls. The head is sculpted with a few stainless steel clay sculpting tools and, more often then you would think, is shaped by my fingers. When I'm all done, this dragon artdoll will be for a St. George & the Dragon illustration.

ย 

Watch Part 1 in the St. George & the Dragon Piece | Dragon Head Sculpt with Clay:

In this video, I share my process of how to make a dragon head sculpt with clay. This is the first part in a series of a St. George and the Dragon mixed media pieces that I'm working on.

ย 

The majority of my future videos will focus on fantasy characters from mythology and folk-lore, I've got some fey characters lurking in my sketchbook waiting to be brought to life. I've thought about doing fan art of characters I love, but I'm still not 100% sure I will- I'd love to make a Daredevil (and a bunch of the other Defenders characters) or The Rhino from Spider-Man (The Rhino's costume is just ridiculous!) or maybe if I do make them, I'll re-imagine them as fitting into more of a fantasy setting. What do you think? I'd also love to make the time to play around with stop-motion animation with my poseable art dolls.

ย 

If you want to make the imaginary a reality, be sure to subscriber on YouTube!

If you want to be the first to know when I launch new polymer clay art videos, be sure to subscribe to my YouTube channel and hit the bell icon (but because YouTube's wonky, you can also join the newsletter).

ย